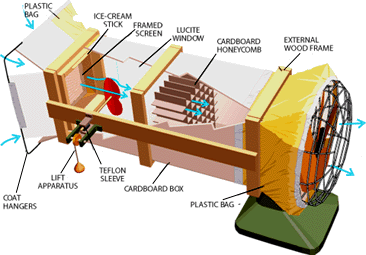
WIND TUNNEL, fashioned from a cardboard box, allows amateur experimenters to make a variety of aerodynamic measurements.
Controlled fiight might be the most vexing experimental problem ever to be solved. Some of the greatest thinkers through the ages have attacked it, including Leonardo da Vinci, who penned more than 500 drawings and 35,000 words on the subject. Of the many intractable difficulties human fiight posed, aerodynamic stability ultimately proved to be the hardest to master. An airplane can pitch up and down, roll left and right, and yaw side to side. Straight and level fiight requires all three of these motions to be managed simultaneously.
That challenge was finally answered by two of the most talented amateur researchers the U.S. has ever seen. Although most people think of them more as working-class do-it-yourselfers, Orville and Wilbur Wright would be better remembered as gifted scientists. One of their greatest contributions began in 1901, when they developed the wind tunnel into a precise research instrument. The Wright brothers used it to perform thousands of systematic measurements, the first truly reliable determinations of this kind in the emerging field of aeronautics. That effort made possible their success two years later at Kitty Hawk, N.C.
Wind tunnels still afford amateurs countless research opportunities in aerodynamics and beyond. Of course, a wind tunnel will allow you to tailor the design of kites, model airplanes, sailboats and racing cars for improved performance. In fact, a wind tunnel will let you study almost anything that is affected by moving air. For example, you can observe the interplay between waves and wind on a liquid surface. Environmentalists may want to examine evaporation through different types of soils or measure the wind's velocity profile above a tray of grass, soils or asphalt. With a wind tunnel, you can also investigate how insects cope with strong breezes or mount the chamber vertically to find the terminal speed of waterdrops suspended on a column of air. With a little imagination, the possibilities for exploration are probably endless.
For my own experiments, I recently put together an inexpensive wind tunnel that uses a household fan to draw air through the test region. A long cardboard box, available from Mail Boxes Etc. or other similar shipping outlets, forms the central tube. Mine measures 30 by 30 by 122 centimeters (12 by 12 by 48 inches), but the precise dimensions are not important. Just make sure that the length of the box is at least four times its width. Painting the interior of the box a glossy white will make your experiments easier to see. To keep slight air currents from passing directly through the cardboard itself, you should double-coat the exterior with latex-based enamel paint.
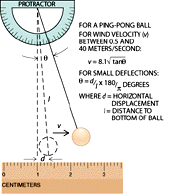
PING-PONG BALL suspended from a string serves to measure wind speed.
A sheet of Lucite forms the window. Have your local hardware store cut a rectangular pane 20 by 30 centimeters (eight by 12 inches) in size. Trace the windowsill around the pane [see illustration for placement] and cut out the opening using a box cutter. Temporarily place waxed paper behind the hole and support it with a wide scrap of wood. Then run a bead of silicone cement around the Lucite and press it into the sill so it is fiush with the wood. Make the seal airtight by caulking the joint with silicone cement.
To bolster the tube, fashion three tight-fitting rectangular frames from wood slats and glue them to the outside of the tunnel. Horizontal slats help to make the structure more rigid and support the measuring equipment.
Some household fans can drive wind as quickly as five meters per second. Adding a restriction, like the one shown in the illustration on the next page, increases the speed of the airfiow (just as putting your thumb over the end of a garden hose shoots the water more rapidly). Decreasing the cross-sectional area in the test region by two thirds will, for example, nearly triple the airspeed you can attain. If you need still stiffer winds, check your local industrial liquidators for more powerful fans. Most commercial fans use a four-position switch to control their speed. For finer adjustment, replace this unit with a household light dimmer. Use duct tape to attach the fiaps of the box to the fan. Plastic trash bags, slit at the bottom, make excellent airtight sleeves. Slip one over the fan and the box and tape it into place.
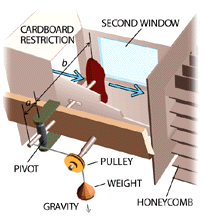
DRAG APPARATUS uses a pivot and weights to gauge the aerodynamic force.
Flair the entrance to the wind tunnel by bending the fiaps on the opposite side outward and attaching them to a square fashioned from two wire coat hangers. Epoxy and then tape the wire square to the outside of the fiaps as shown. Afterward, place another garbage-bag sleeve around this end of the tunnel to make it airtight as well.
The exhaust from the fan creates air currents in the room, and some of these swirling eddies will invariably drift back into the tunnel. A single layer of window screen at the mouth of the tunnel helps to smooth out these unwanted irregularities. Staple the screen to a wood frame that fits snugly inside the opening. Line the outer edge with felt to prevent air from leaking in around the sides. You will need access to the interior, so do not affix the frame permanently. Glue four ice-cream sticks onto the inner walls just deep enough inside from the mouth to keep the screen in place during tests. A "honeycomb" assembly (really, a square grid of cardboard baffies) just downstream of the test region helps to maintain a smooth fiow of air for your experiments.
You can measure the airspeed inside the tunnel using a number of devices, including a hot-ball anemometer [see The Amateur Scientist, November 1995, for construction details], a cup anemometer from an old weather station, a manometer or an ultrasonic anemometer. Or you can combine a Ping-Pong ball, a protractor and a length of white thread into a simple instrument. The angle the string attains will depend on the relative strengths of the forces of gravity and aerodynamic drag on the ball. Use the equation given in the illustration. The value you obtain should be good to about 10 percent, but because of certain subtleties of fiuid dynamics, it is valid only between 0.5 and 40 meters per second.
People with a passion for aeronautics will probably want to measure aerodynamic forces. Determining all possible forces and torques requires six simultaneous measurements. But experimenters are often interested in just one quantity--the lift on a wing or the drag on a surface, for example. The two setups shown will let you measure either lift or drag (but not both simultaneously). Mounting your models sideways takes gravity out of the equation.
To measure lift, increase the counterweight until the model remains in place when released. The weight then equals the aerodynamic force on the model. For drag, the counterweight applies a torque that balances the torque applied by the drag force. The drag force then equals the ratio of the moment arms (a/b) times the counterweight. If you don't have a set of calibrated weights, loose change will do. If you have more sophisticated needs, the references listed on the World Wide Web site of the Society for Amateur Scientists describe more elaborate balance systems. As a final challenge, you may want to figure out how to record the forces electronically.
|